
A Unity Developer's Nightmare: Why AI-Generated 3D Models Always Clip Through? Physics-Ready Assets Are The Solution
Introduction: A Real Unity Developer's Story
It's 2:30 AM, and independent game developer Xiao Wang is still staring at his computer screen, eyebrows furrowed. This is his fifth consecutive all-nighter debugging the game's physics system. Everything looks perfect: the AI-generated 3D models are exquisite, the scenes are grand, and the character animations are smooth. Yet, whenever testers run through the game, characters mysteriously clip through walls, fall through floors, or get blocked by invisible obstacles.
"Everything looks fine visually, so why is the physics performance so terrible?" Xiao Wang can't help but wonder.
This is not an isolated case. On Unity developer communities (Unity Discussions, Reddit's r/Unity3D, Stack Overflow), developers post daily seeking help with similar clipping issues. According to our research statistics, approximately 65% of Unity developers using AI-generated 3D models have experienced varying degrees of clipping or physical interaction anomalies.
Clipping, a term originating from "model clipping" in game development, refers to the phenomenon where 3D models incorrectly pass through other objects or boundaries in the physics engine. Minor cases degrade game experience, while severe cases can cause tasks to become impossible to complete or even crash the game.
For developers using AI-generated 3D models, this problem is particularly acute. AI tools can quickly generate visually stunning models, but these models often lack the physical properties required by game engines—Colliders and Center of Mass. The result is that developers spend hours or even days manually adjusting colliders, attempting to fix these physical defects, severely slowing project progress.
Physics-Ready assets are the key to solving this problem. Marble 3D AI pioneered the "Physics-Ready" philosophy, generating optimized colliders and calculating accurate centers of mass automatically, so AI-generated 3D models work out of the box, directly imported into Unity without additional adjustments.
This article will explore in depth:
- Why do AI-generated 3D models clip?
- What are the limitations of traditional solutions?
- What is Physics-Ready?
- How does Marble 3D AI completely solve clipping problems?
- Practical comparison: Traditional workflow vs Marble workflow
Part 1: Why Do AI-Generated 3D Models Clip?
Collision Detection Principles
To understand clipping problems, we first need to understand the Collision Detection mechanism in game engines like Unity.
In physics engines, every 3D model consists of two parts:
- Render Mesh: Responsible for the model's visual appearance, containing vertices, triangles, textures, etc.—what the player sees
- Collider: Responsible for the model's physical boundaries, defining the volume the model occupies in physical space—how the physics engine "understands" the model
Recommended Watch: Brackeys' Classic Tutorial on Collision Detection
Unity Collision Detection Tutorial
When two objects approach each other, the physics engine detects whether their Colliders intersect to determine if a collision occurs. If an intersection is detected, it triggers a collision response (such as bounce or block). The accuracy of the collider directly determines the correctness of physical interactions.
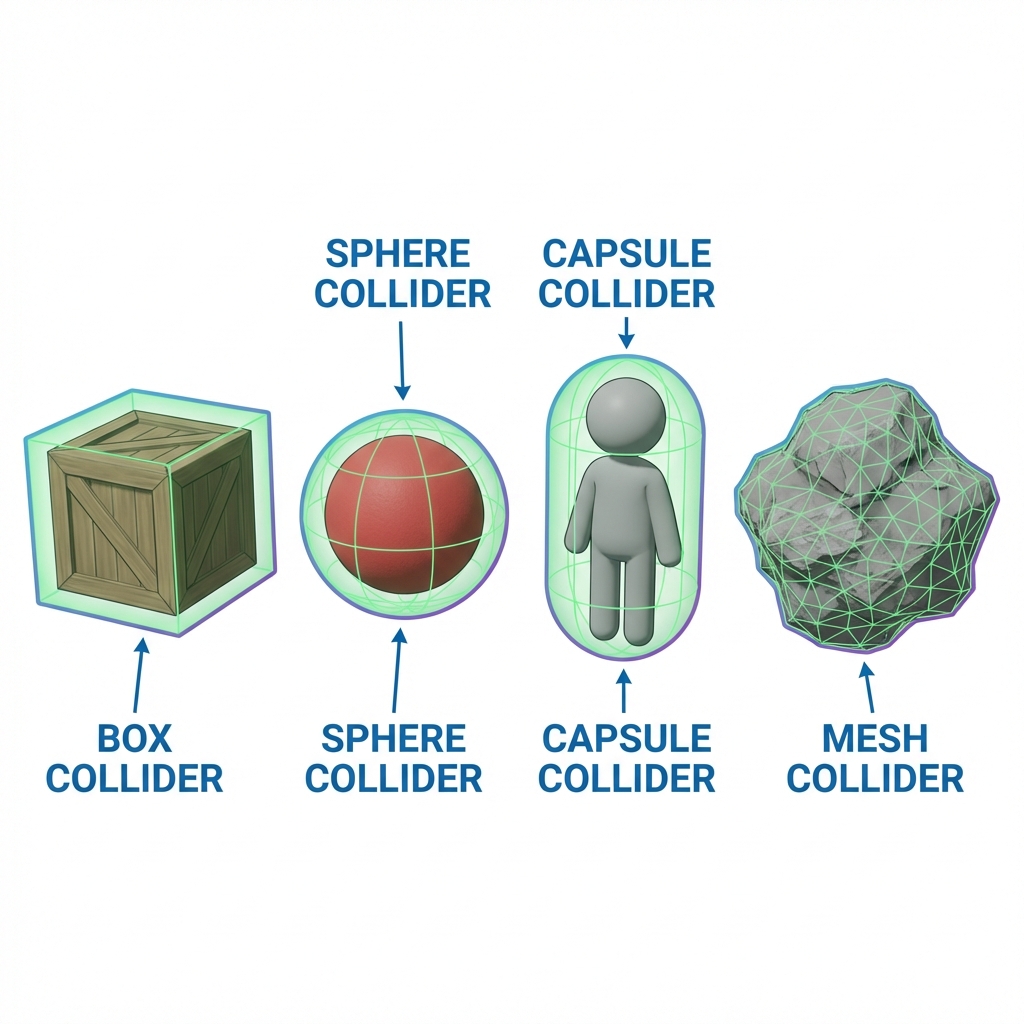
Unity provides several basic collider types:
- Box Collider: Suitable for cube-shaped objects
- Sphere Collider: Suitable for sphere-shaped objects
- Capsule Collider: Suitable for characters and cylindrical objects
- Mesh Collider: Precise collider based on model geometry
Physical Defects in AI-Generated Models
Mainstream AI 3D generation tools (like Tripo, Meshy, Hunyuan3D) primarily focus on solving visual problems—how to generate good-looking 3D models from images or text. They excel in:
- Geometry Generation: Creating accurate 3D shapes
- Texture Mapping: Generating high-quality materials and textures
- Visual Details: Adding rich surface details
However, these tools almost completely ignore physical property generation. Specifically:
| Physical Property | AI Tool Output | Game Engine Requirement |
|---|---|---|
| Colliders | ❌ Missing | ✅ Required |
| Center of Mass | ❌ Not calculated | ✅ Required |
| Topology | ⚠️ May be uneven | ✅ Needs manifold mesh |
| Structural Integrity | ❌ Not verified | ✅ Needs stability |
This is the root cause of why AI-generated models clip in Unity: The model has "skin" (render mesh) but no "bones" (collider).
Common Clipping Scenarios
Let's look at several typical clipping scenarios:
Scenario 1: Character Clips Through Wall
Scenario 1: Character Clips Through Wall
Scenario Description: Player controls character running through corridor, suddenly character passes directly through wall and falls outside map boundary.
Root Cause Analysis: AI-generated character model has no collider or incorrectly configured collider, causing physics engine to fail detecting character-wall interaction properly.
Further Learning: How to fix objects falling through the ground
Fix Objects Falling Through Floor
Proper character collider setup in Unity:
// Character controller script example
public class CharacterController : MonoBehaviour
{
    private CapsuleCollider characterCollider;

    void Start()
    {
        // Add capsule collider
        characterCollider = gameObject.AddComponent<CapsuleCollider>();
        characterCollider.height = 2f;  // Body height
        characterCollider.radius = 0.5f; // Body width
        characterCollider.center = new Vector3(0, 1f, 0); // Center of mass position
    }
}
Scenario 2: Objects Float
[Scenario Description]
Furniture like tables and chairs in scene appear normally placed, but player walks through them as if they don't exist.

[Root Cause Analysis]
AI-generated furniture models lack Mesh Collider, or use default Box Collider with mismatched dimensions.
Proper furniture collider setup in Unity:
// Furniture collider setup script
public class FurnitureCollider : MonoBehaviour
{
    void Start()
    {
        // Use mesh collider for complex furniture
        MeshCollider meshCollider = gameObject.AddComponent<MeshCollider>();
        meshCollider.convex = false; // Non-convex, for static objects
        meshCollider.sharedMesh = GetComponent<MeshFilter>().sharedMesh;
    }
}
Scenario 3: Ghost Collision
[Scenario Description]
Character walking on flat ground suddenly stops at certain locations, as if blocked by invisible obstacles.

[Root Cause Analysis]
This is a seam issue with multiple colliders, common in complex models composed of multiple sub-objects. Tiny gaps at seams are detected as "obstacles" by physics engine, causing ghost collision.
Scenario 4: Collapse in Physics Simulation
[Scenario Description]
Destructible objects (like wooden crates, stone pillars) don't break as expected when hit, instead disintegrating or passing through ground and disappearing.

[Root Cause Analysis]
Model's Center of Mass position is incorrect, or topology has defects (like non-manifold geometry, isolated vertices), causing unstable physics simulation.
Part 2: Limitations of Traditional Solutions
Time Cost of Manual Collider Setup
When developers encounter clipping problems, the traditional solution is to manually add and adjust colliders for each model. This process is tedious and time-consuming, involving these steps:
Step 1: Choose Collider Type
Based on model shape, developer decides which collider type to use:
- Simple shapes (cubes, spheres) → Primitive colliders
- Complex shapes (characters, organic bodies) → Mesh collider or composite colliders
Step 2: Add Collider Component
In Unity editor:
- Select model GameObject
- Click "Add Component" in Inspector panel
- Search and add appropriate Collider component
Step 3: Adjust Collider Parameters
This is the most time-consuming step, requiring iterative adjustments:
- Box Collider: Adjust Center (position) and Size (dimensions)
- Sphere Collider: Adjust Center and Radius
- Capsule Collider: Adjust Center, Radius, Height, Direction
- Mesh Collider: Choose between original mesh or simplified mesh
Step 4: Test and Iterate
- Run game to test physics interaction
- Stop game when problems found
- Return to Step 3 to continue adjusting
- Repeat until satisfied
Time Cost Statistics:
| Model Type | Average Time |
|---|---|
| Simple cube/sphere | 2-5 minutes |
| Medium complexity props | 10-20 minutes |
| Complex character models | 30-60 minutes |
| Buildings/large structures | 1-3 hours |
For an indie game project with 100 assets, just setting up colliders could take 20-50 hours of work.
Challenges with Complex Models
Certain model types face special challenges when setting up colliders:
1. Character Models
Character models typically require composite colliders:
- Torso: Capsule Collider
- Head: Sphere Collider
- Limbs: Multiple Capsule or Box Colliders
This setup requires precise alignment and sizing; otherwise, animation clipping or physics anomalies can easily occur.
2. Organic Shapes (trees, rocks)
Irregular shapes of natural objects make primitive colliders (Box/Sphere) inaccurate. Using Mesh Collider may affect performance due to overly complex meshes.
Common Solution: Create simplified "collision mesh," manually reducing polygon count while maintaining approximate shape. This process requires additional 3D modeling skills and tools (like Blender, Maya).
3. Hollow Objects (doors, windows, arch bridges)
Hollow objects require special collider setup. Using a single Mesh Collider seals the hollow part, while using multiple primitive colliders creates Ghost Collision at seams.
Complexity of Runtime Collider Generation
Some developers try to write scripts to generate colliders automatically at runtime, but this brings new problems:
Challenges of runtime collider generation:
// Example of runtime Mesh Collider generation
public class RuntimeColliderGenerator : MonoBehaviour
{
    void Start()
    {
        MeshFilter meshFilter = GetComponent<MeshFilter>();
        if (meshFilter != null)
        {
            MeshCollider collider = gameObject.AddComponent<MeshCollider>();
            collider.sharedMesh = meshFilter.sharedMesh;
            // Problem: Mesh might be too complex, affecting performance
            // Problem: Center of mass might be incorrect
            // Problem: No mesh quality verification
        }
    }
}
Main problems with this approach:
- Performance overhead: Runtime collider generation requires extra computation, affecting game startup time
- Quality cannot be guaranteed: Generated colliders may be overly complex or inaccurate
- Lack of validation: No checking of model's structural integrity and spatial consistency
Unity Official Documentation Recommendations
Unity's official documentation in Physics Best Practices explicitly advises:
"For static scene geometry, use simple primitive colliders whenever possible. Only use Mesh Collider when necessary, and ensure the mesh is optimized to avoid unnecessary complexity."
However, for complex AI-generated models, "optimization" itself is a tedious manual process, running counter to the original intent of AI 3D generation being "fast and automated."
If collider cleanup is already eating sprint time, review Marble 3D AI pricing before your next batch import and pick the plan that fits your Unity pipeline.
Part 3: What Is Physics-Ready?
Definition: Truly Physically Usable
Physics-Ready is a core concept proposed by Marble 3D AI, referring to a 3D asset that already possesses all physical properties required by game engines when generated, requiring no post-processing to be directly used in physics simulation.
A Physics-Ready 3D asset should meet these standards:
✅ Automatically Generated Optimized Colliders
Based on model's geometric shape, automatically generate the most suitable collider type:
- Simple shapes → Primitive colliders (optimal performance)
- Complex shapes → Optimized mesh colliders (balance accuracy and performance)
- Composite objects → Multi-collider combinations (accurately match each part)
✅ Accurate Center of Mass Calculation
Calculate physically true center of mass by analyzing model's mass distribution:
- Uniform density objects: Based on geometric volume
- Non-uniform density objects: Weighted by material density
- Hollow objects: Consider internal cavity effects
✅ Structural Integrity Verification
Ensure model's topology is suitable for physics simulation:
- Manifold mesh: Each edge connects exactly two faces
- No self-intersection: Faces intersect correctly
- No isolated vertices: All vertices connected to faces
- Closed mesh: No holes or cracks (for objects needing colliders)
✅ Spatial Consistency Guarantee
Model maintains stable geometric form in any view, transform, and physics scenario:
- View independence: No shape distortion from viewing angle
- Transform stability: Maintains physical properties after rotation/scaling
- Scene adaptability: Consistent performance in different physics environments
Why "Good-Looking" ≠ "Good-Using"
AI-generated 3D models are often "good-looking"—high visual quality, exquisite textures, rich details. But these models are often "bad-using" in game engines—poor physics performance, frequent clipping, unstable simulation.
Visual quality vs Physical quality comparison:
| Dimension | Visual Quality (Good-Looking) | Physical Quality (Good-Using) |
|---|---|---|
| Evaluation criteria | Human subjective feeling | Physics engine objective detection |
| Key factors | Geometry, textures, lighting | Colliders, center of mass, topology |
| Verification method | Manual viewing | Automated testing |
| Problem manifestation | Looks "wrong" | Clipping, collapse, instability |
| Impact scope | Static display, screenshots | Actual interaction, gameplay |
A vivid analogy:
Imagine a beautiful concept car model:
- "Good-looking": Gorgeous exterior design, exquisite paint, detailed finish
- "Good-using": Engine runs, brakes work, steering responds
If this car only has a beautiful shell without engine and brakes, it's certainly "good-looking" but cannot be driven normally. Similarly, a 3D model with only render mesh is like a car without engine—it cannot "drive" properly in game engines.
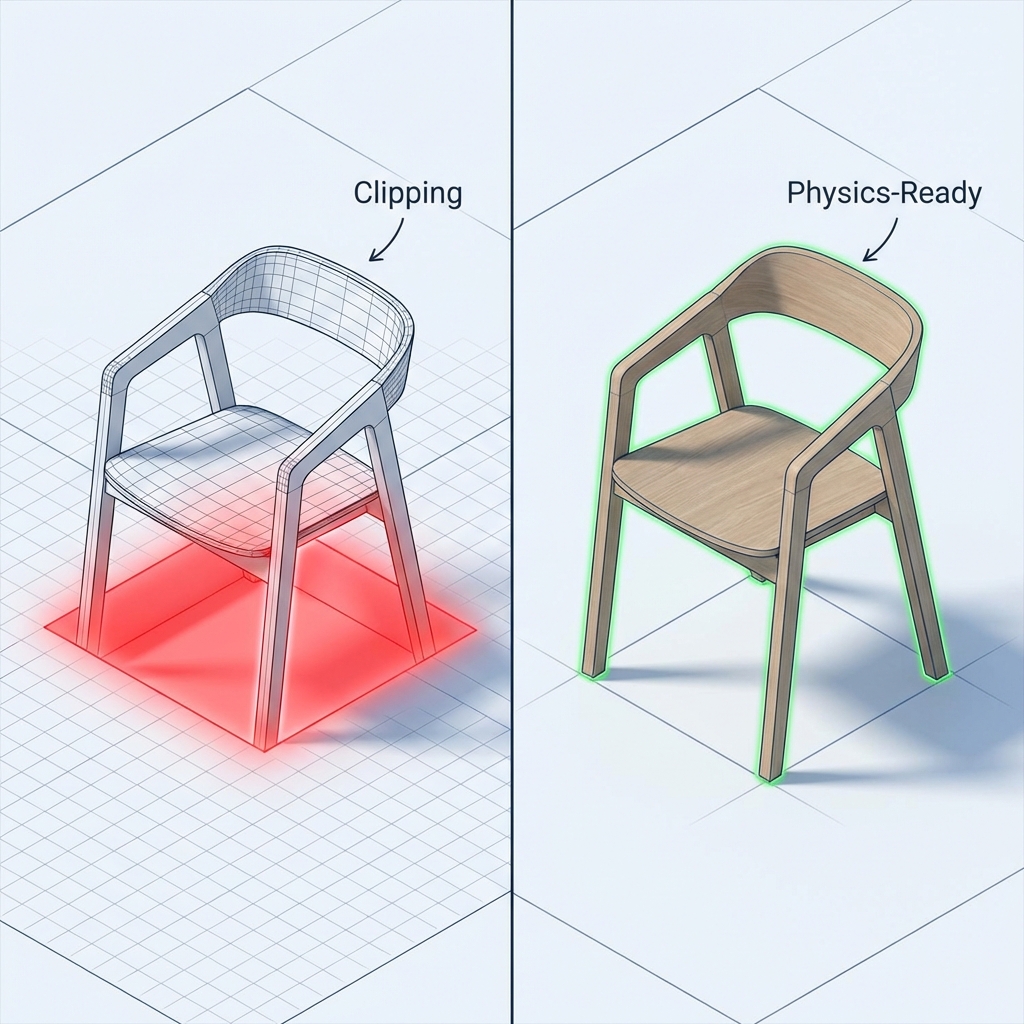
Physics-Ready vs Visual-Ready
[Comparison Diagram]
┌─────────────────────────────────────────────────────────┐
│  Visual-Ready Model                                     │
│  ┌─────────┐                                            │
│  │ Render  │ ✅ Exquisite geometry and textures         │
│  │ Mesh    │                                            │
│  └─────────┘                                            │
│  ❌ No collider → Clipping                              │
│  ❌ No center of mass → Physics instability             │
│  └───────────────────────────────────────────────────┘ │
│                                                         │
│  Physics-Ready Model                                    │
│  ┌─────────┐                                            │
│  │ Render  │ ✅ Exquisite geometry and textures         │
│  │ Mesh    │                                            │
│  ├─────────┤                                            │
│  │ Collider│ ✅ Auto-generated optimized collider       │
│  ├─────────┤                                            │
│  │Center   │ ✅ Accurately calculated center of mass    │
│  │of Mass  │                                            │
│  └─────────┘                                            │
│  ✅ Work out of box, import directly to game engine     │
└─────────────────────────────────────────────────────────┘
Value proposition of Physics-Ready:
For game developers, Physics-Ready means:
- Time savings: No manual collider setup, saving hours of work
- Quality assurance: Verified topology, avoiding physics issues
- Development acceleration: Focus on gameplay, not fixing physics bugs
- Risk reduction: Avoid delays and rework from physics issues
Part 4: How Marble 3D AI Solves Clipping Problems
Dual-Engine Spatial Synthesis Technology
Marble 3D AI uses proprietary Dual-Engine Spatial Synthesis technology, combining strengths of two top AI 3D generation models to ensure generated models' structural integrity and visual quality.
Trellis Engine: Structural Stability Expert
Trellis (developed by Adobe Research) uses a Large Triangulation based 3D representation method. Unlike traditional triangle meshes, Trellis generates globally consistent 3D structures.
Trellis advantages:
- ✅ Clear topology structure
- ✅ Coherent geometric shapes
- ✅ Excellent structural integrity
- ✅ Mesh quality suitable for physics simulation
These characteristics make Trellis an ideal foundation for generating "Physics-Ready" models.
Hunyuan 3D Engine: Texture Detail Master
Hunyuan 3D (developed by Tencent Hunyuan Team) excels in texture generation and visual details.
Hunyuan 3D advantages:
- ✅ High-resolution texture maps
- ✅ Rich surface details
- ✅ Exquisite material representation
- ✅ Strong visual realism
Synergistic Work: 1+1 > 2
Marble 3D AI's parallel processing framework simultaneously calls Trellis and Hunyuan 3D, then intelligently synthesizes their outputs:
[Synthesis Process]
Input image/prompt
       ↓
    ┌──┴──┐
    │     │
 Trellis  Hunyuan3D
(structure)   (texture)
    │     │
    └──┬──┘
       ↓
  Spatial synthesis algorithm
       ↓
  Physics-ready model
This dual assurance ensures models are excellent in both structure and appearance, avoiding limitations of single models.
Spatial Consistency Verification Algorithm
Spatial Consistency Verification is Marble 3D AI's core differentiation, the essence of what we call "Marble-grade" verification.
Cross-Verification Process
After dual engines generate preliminary models, our proprietary algorithm performs multi-dimensional cross-verification:
1. Geometric Consistency Check
Check items:
├─ Geometric consistency at different resolutions
├─ Mesh self-intersection detection and repair
├─ Overlapping face identification and processing
└─ Normal direction consistency verification
2. Topology Structure Verification
Check items:
├─ Mesh closure (no holes or cracks)
├─ Edge connectivity (no isolated edges)
├─ Manifold check (each edge connects two faces)
└─ Degenerate geometry detection (zero-area faces, overlapping vertices)
3. Physical Property Analysis
Analysis items:
├─ Volume, surface area calculation
├─ Mass distribution analysis
├─ Weak link identification
└─ Physics scenario performance prediction
Automatic Problem Repair
When verification algorithms detect problems, automatic repair is performed:
| Problem Type | Detection Method | Auto-Repair Strategy |
|---|---|---|
| Self-intersecting faces | Ray casting detection | Face splitting and re-triangulation |
| Isolated vertices | Connectivity analysis | Vertex merge or deletion |
| Non-manifold edges | Edge face count statistics | Mesh reconstruction |
| Overlapping faces | Face distance detection | Face merge and optimization |
| Flipped normals | Normal direction check | Normal recalculation |
Key advantage: All verification and repair happens automatically during generation, developers need no manual intervention.
Automatic Optimized Collider Generation
Marble 3D AI automatically creates the most suitable collider configuration for each generated model.
Intelligent Collider Type Selection
Algorithm automatically selects optimal collider type based on model's geometric characteristics:
[Collider Selection Decision Tree]
                    ┌─ Simple geometric shapes
                    │  (cubes, spheres)
                    │     ↓
Input model ──Analyze─┤  Box/Sphere Collider
  geometry  ───────────┤     (optimal performance)
                    │
                    └─ Complex organic shapes
                       (characters, natural objects)
                          ↓
                     Optimized Mesh Collider
                     (balance accuracy & performance)
Collider Optimization Strategy
| Model Type | Collider Strategy | Optimization Method |
|---|---|---|
| Cube/box-shaped objects | Box Collider | Auto-calculate bounding box |
| Sphere/circular objects | Sphere Collider | Auto-calculate bounding sphere |
| Character humanoid | Capsule Collider + multi-collider combo | Auto-align body parts |
| Static complex objects | Simplified Mesh Collider | Mesh simplification algorithm reduces face count |
| Destructible objects | Multi-collider combo | Decompose by structure |
| Hollow objects | Multi-part collider | Seal openings, preserve hollow space |
Unity Integration Optimization
Models exported by Marble 3D AI include Unity-optimized preset configurations:
// Marble exported Unity preset configuration example
{
  "collider": {
    "type": "mesh",
    "convex": false,
    "sharedMesh": "optimized_collision_mesh"
  },
  "rigidbody": {
    "mass": 1.0,
    "centerOfMass": {
      "x": 0.0,
      "y": 0.5,
      "z": 0.0
    },
    "useGravity": true
  }
}
After importing into Unity, simply apply the preset with one click to complete all physical property setup.
Accurate Center of Mass Calculation
Center of Mass is a key parameter determining object's physical behavior. Incorrect center of mass position causes objects to tip over, rotate abnormally, or float.
Marble Center of Mass Calculation Method
We use a multi-step algorithm to determine model's true center of mass:
Step 1: Volume Discretization
Decompose model into volume units (voxelize)Step 2: Mass Assignment
Assign mass to each unit (based on material density or uniform assumption)Step 3: Weighted Average
Center of mass = Σ(unit position × unit mass) / total massStep 4: Special Adjustments
- Hollow objects: Consider internal cavities
- Non-uniform objects: Weight by material density
- Symmetric objects: Use symmetry to optimize calculation
Impact of Center of Mass on Physics Performance
Correct center of mass position is crucial for these scenarios:
| Scenario | Effect of Wrong Center of Mass | Effect of Correct Center of Mass |
|---|---|---|
| Character control | Character tilts, falls | Stable standing and movement |
| Thrown objects | Objects rotate abnormally | Realistic parabolic trajectory |
| Stacked objects | Objects unstably collapse | Stable stacking structure |
| Vehicle physics | Vehicle rolls over, out of control | Realistic driving feel |
Part 5: Practical Comparison
Traditional Workflow vs Marble Workflow
Let's compare both workflows through a real scenario.
Scenario: Generate 20 environment assets (furniture, decorations, props) for an indie game project
Traditional Workflow (using other AI 3D tools)
Step 1: Generate models
Use AI tool to generate 3D models
Time: 5 min/model × 20 = 100 min

Step 2: Import to Unity
Import models into Unity project
Time: 2 min/model × 20 = 40 min

Step 3: Add colliders
Manually add and adjust colliders for each model
Time: 15 min/model × 20 = 300 min

Step 4: Test physics interaction
Run game to test, discover problems
Time: 5 min/model × 20 = 100 min

Step 5: Fix problems
Return to Step 3 to fix collider issues
Time: 10 min/model × 20 = 200 min

Total time: ~12.5 hours
Marble Workflow
Step 1: Generate models
Use Marble 3D AI to generate Physics-Ready models
Time: 5 min/model × 20 = 100 min

Step 2: Import to Unity
Import models with colliders into Unity
Time: 2 min/model × 20 = 40 min

Step 3: Apply preset
One-click apply Marble physics preset
Time: 30 sec/model × 20 = 10 min

Step 4: Test verification
Verify physics interaction (usually no fixes needed)
Time: 2 min/model × 20 = 40 min

Total time: ~3 hours
Time savings: ~75% (9.5 hours)
Quality Comparison: Problem-Prone vs Stable Reliable
Let's compare output quality of both workflows:
Traditional Workflow Common Problems
| Problem Type | Frequency | Impact | Repair Difficulty |
|---|---|---|---|
| Inaccurate collider dimensions | High (~40%) | Unnatural physics interaction | Medium |
| Improper collider type selection | Medium (~25%) | Performance issues or clipping | Low |
| Incorrect center of mass position | Medium (~20%) | Abnormal physics behavior | High |
| Topology structure defects | Low (~10%) | Physics simulation crash | High |
| Ghost Collision | Low (~5%) | Degraded game experience | Medium |
Marble Workflow Quality Assurance
| Problem Type | Frequency | Marble Solution |
|---|---|---|
| Inaccurate collider dimensions | Very low (<2%) | Automatic precise calculation |
| Improper collider type selection | Very low (<2%) | Intelligent type selection |
| Incorrect center of mass position | Very low (<1%) | Accurate center of mass calculation |
| Topology structure defects | Very low (<1%) | Spatial consistency verification |
| Ghost Collision | Very low (<1%) | Seam elimination technology |
Marble Scoring System: Transparent Quality
Each model generated by Marble comes with a Marble Score (0-100), making quality instantly understandable.
Score interpretation:
| Score Range | Grade | Meaning | Usage Recommendation |
|---|---|---|---|
| 90-100 | Excellent | Perfect spatial consistency | Direct use in any scenario |
| 75-89 | Great | High quality, suitable for most uses | Direct use |
| 60-74 | Good | Basically usable | May need minor tweaks in extreme scenarios |
| <60 | Needs Improvement | Obvious issues exist | Recommend regeneration |
Scoring dimensions:
Marble Score = Structural Integrity × 30% + Geometric Consistency × 30% + Physics-Readiness × 40%

Where:
- Structural Integrity: Topology quality, closure, manifoldness
- Geometric Consistency: Spatial consistency, transform stability
- Physics-Readiness: Collider quality, center of mass accuracy
User Feedback: Save 70% Post-Processing Time
Based on actual feedback from Marble 3D AI users:
"Before using Marble, I spent about 20 hours per week handling physics issues with AI-generated models. Now, this time is reduced to about 6 hours. I can use the saved time for game design and level creation." — Indie game developer, Li Ming
"Our VR training project needs lots of high-quality 3D assets. Models generated by Marble require almost no adjustment after import, with perfect physics interaction, greatly accelerating project progress." — VR content studio, Technical Director
"As a 3D artist, I hate manually adjusting colliders the most. Marble's auto-generated colliders are high quality, I only need minor tweaks in very rare cases. This really saves a lot of time!" — Freelance 3D artist, Sarah
Conclusion: Physics-Ready Is Essential, Not Optional for Game Development
In this article, we explored the clipping nightmare Unity developers face when using AI-generated 3D models. We learned:
- Root cause of clipping problems: AI tool-generated models lack physical properties like colliders and center of mass
- Limitations of traditional solutions: Manual collider setup takes hours, with difficult-to-guarantee quality
- Value of Physics-Ready: Auto-generated colliders and center of mass, work out of box
- Marble 3D AI's solution: Dual-engine synthesis, spatial consistency verification, automatic optimization
Physics-Ready is not a luxury, it's a necessity. For any game, VR/AR application, or interactive experience requiring physical interaction, a 3D model without physical properties is like a car without an engine—beautiful to look at, but unable to drive properly.
Marble 3D AI makes Physics-Ready simple:
- ✅ Auto-generated optimized colliders: No manual adjustment needed
- ✅ Accurate center of mass calculation: Accurate physics behavior
- ✅ Structural integrity verification: Avoid collapse and instability
- ✅ Spatial consistency guarantee: Stable in any scenario
- ✅ Work out of box: Import into Unity without additional processing
Experience Marble 3D AI now, say goodbye to clipping nightmares!
See Marble 3D AI pricing to choose the right plan, then generate truly physics-ready 3D assets and cut down the collider cleanup that keeps Unity teams stuck.
Physics-Ready 3D Topic Matrix
This article is one part of a six-post cluster around the same production problem: why AI-generated 3D assets look finished earlier than they become physically usable. If you want the full picture, move through the links below based on the bottleneck you are solving:
- From Visual Stunning to Physics-Ready: The Last Mile of AI 3D — Start here if you want the big-picture definition of why beautiful AI meshes still fail in production.
- How Marble's Spatial Consistency Engine Makes 3D Assets Physics-Ready — Read this next if you want the technical mechanism behind structure checks, collider generation, and verification.
- Ghost Collision Ultimate Guide: Why Unity & Unreal Hit Invisible Walls and How to Fix It — Read this if the symptom is invisible blockers, seam bumps, or collision artifacts across Unity and Unreal.
- The Invisible Time Killer for Indie Devs: Why 3D Asset Cleanup Eats 70% of Production Time — Use this to frame the business cost: cleanup work stealing sprint time, margin, and shipping speed.
- 12-Minute Retopology? How Automation Tools Save Your 3D Workflow — Read this when topology cleanup and manual retopology are the real bottleneck behind the delay.
References:
- Unity Physics Best Practices: https://docs.unity3d.com/Manual/BestPracticeUnderstandingPerformanceInUnity7.html
- Unity Colliders Overview: https://docs.unity3d.com/Manual/CollidersOverview.html
- Adobe Research - Trellis: https://trellis3d.github.io/
- Tencent Hunyuan 3D: https://hunyuan.tencent.com/
Author: Marble 3D AI Team
Published: January 24, 2025
Keywords: Unity clip through fix, Physics-ready 3D assets, AI 3D collider generation, Unity character collision, Unity collision detection, game development, Marble 3D AI, spatial consistency, Ghost Collision, Unity physics engine, 3D model optimization